Two numbers decide how a custom lanyard looks on a badge and how it feels around a neck: the width of the strap and the length before it folds. Buyers tend to obsess over color and clip style and then accept whatever width and length the order form defaults to, which is how a detailed logo ends up crammed onto a narrow strap or a badge dangles at belt height. Both choices are easy to get right once you take them in order. Set the width first, because it governs how much artwork you can show and which printing method makes sense, then set the length to match how the lanyard will actually be worn.
Width is the single most consequential spec on a lanyard. The common sizes run from three-eighths of an inch, about ten millimeters, up to a full inch at twenty-five millimeters, with five-eighths of an inch, roughly sixteen millimeters, sitting in the middle as the default most events choose. The narrow end carries a repeating logo or a short line of text and little else, so it suits high-volume giveaways where the goal is a clean brand mark rather than a full message. As you move wider, the usable band across the strap grows in step, and every extra millimeter buys room for a website, a tagline, a sponsor lockup or a second color. A three-quarter-inch or one-inch strap turns the lanyard into a small billboard that reads across a crowded room, which is why sponsors and exhibitors gravitate to it.
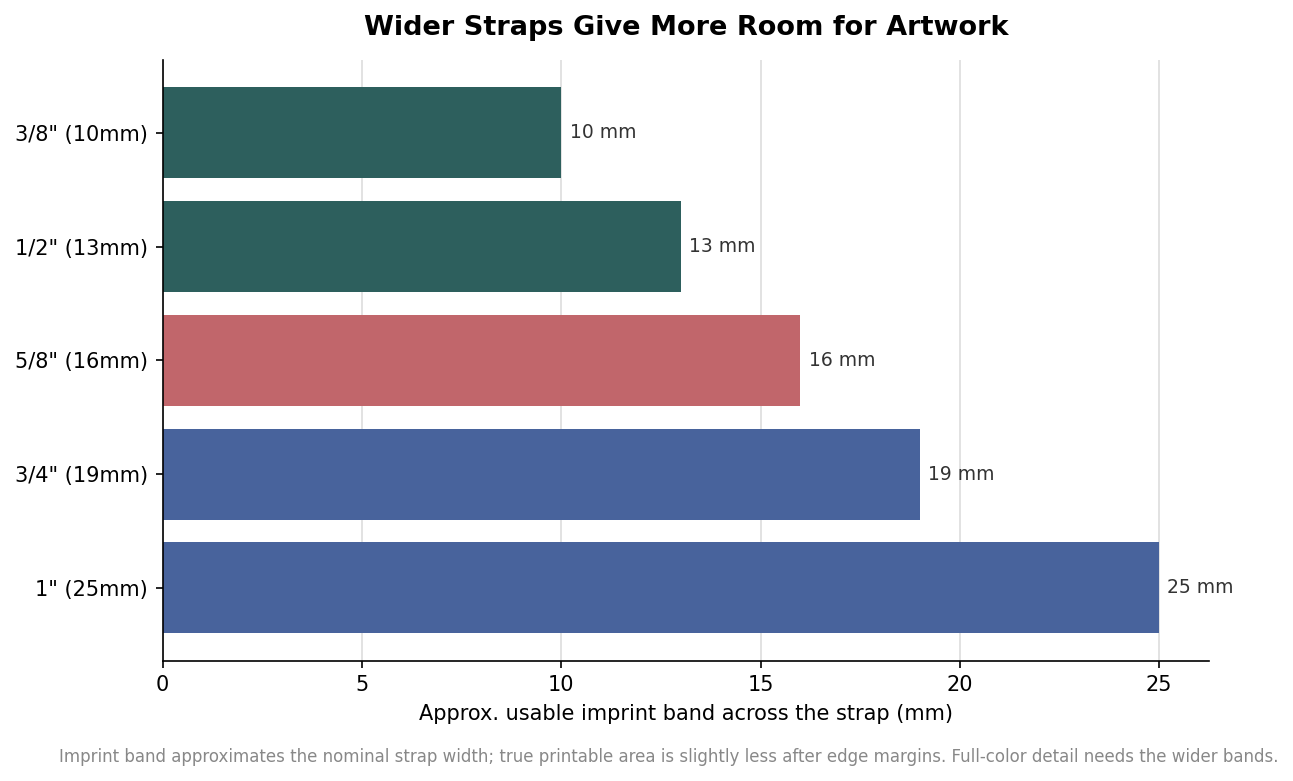
The practical rule is to size the width to the busiest thing you need to print, not to the simplest. If your artwork is only a wordmark, a five-eighths strap is plenty and keeps cost down. If you are combining a logo, an event name and a sponsor, step up to three-quarters or a full inch so the elements have air around them. Printing on both sides doubles your message without changing the width, but it does not rescue a design that is too detailed for a narrow band in the first place.
Width and print method are joined at the hip. Screen printing lays down one or two spot colors and is the economical choice for simple logos at volume; it works on any width but shows its limits fast once a design has gradients or photographic detail. Dye sublimation prints full color edge to edge and is where wider straps earn their keep, because a five-eighths or wider band gives the process enough room to render small type, gradients and multi-color artwork cleanly. Woven lanyards stitch the text and logo into the strap itself for a durable, premium feel, but the weave cannot hold fine gradients, so it favors bold shapes and clear lettering over photographic art. Hot stamping presses a single foil color and reads best as a simple mark on a mid-width strap. The takeaway is that a full-color, detailed design pushes you toward both dye sublimation and a wider strap at the same time, while a clean one-color logo frees you to run narrower and cheaper.
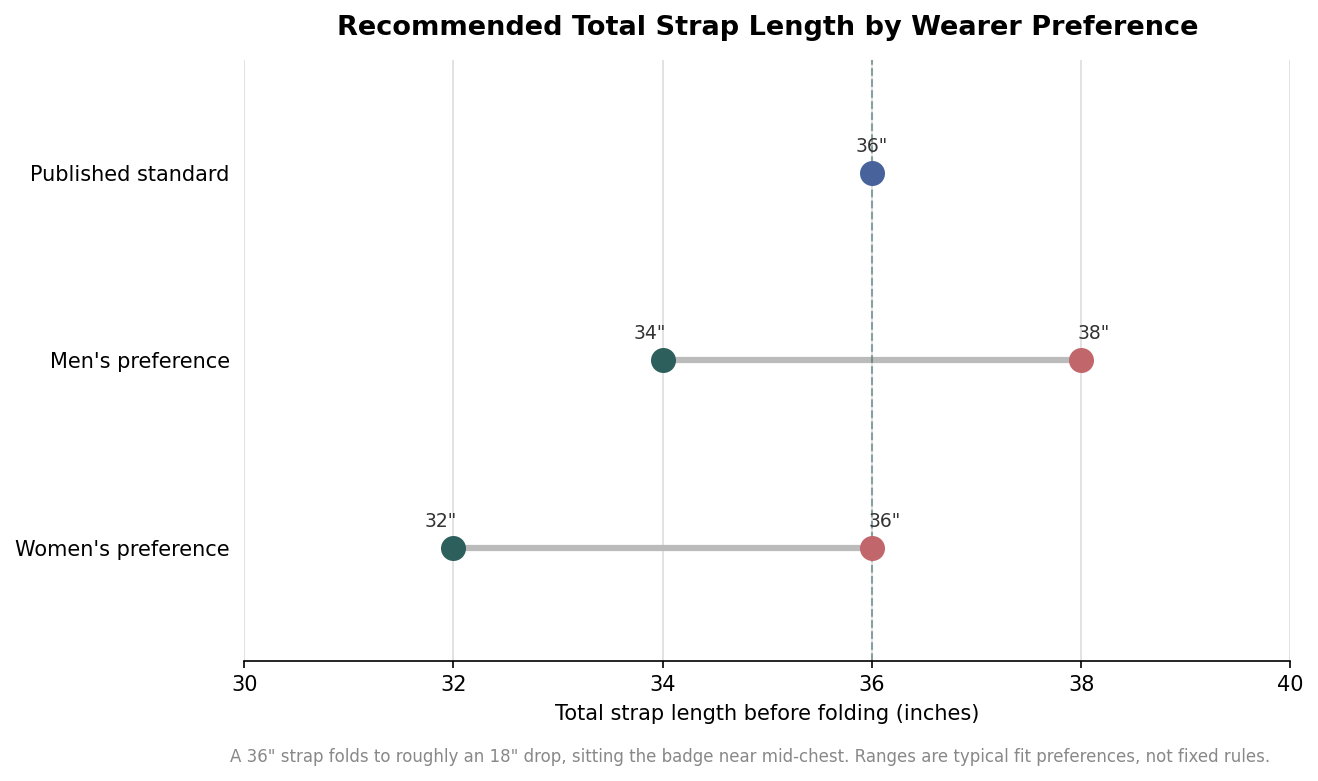
Length is about comfort and badge position, not appearance. The published standard is a thirty-six-inch total strap, which folds in half to a drop of roughly eighteen inches and sits a badge near the middle of an average adult chest. That single number works for most crowds, but preference varies by wearer: many women wear a slightly shorter thirty-two-to-thirty-six-inch strap, while many men prefer thirty-four to thirty-eight inches so the badge does not ride too high. Because the strap folds, remember that the number you specify is the full loop, and the badge hangs at about half that distance from the neck.
When one order has to fit a wide range of people, an adjustable strap with a sliding bead or a buckle lets each wearer tune the drop, which is worth the small added cost for mixed audiences or multi-day conferences where comfort compounds. For seated, all-day wear at a trade show, err slightly longer so the badge clears a table edge; for security or access settings where the badge needs to be scanned quickly, a slightly shorter drop keeps it within easy reach.
Do not forget what hangs at the bottom. The attachment and whatever it holds add to the effective drop, so a bulldog clip, a badge reel or a rigid card holder can push the badge an inch or more below the strap’s fold. If you are running a reel that extends for scanning, factor its retracted length into the total, and shorten the strap slightly so the combined assembly still sits at chest height rather than at the stomach. Width interacts with comfort here too: a wider strap spreads the load of a heavier badge and reel across more of the neck, so if your credential package is bulky, the same three-quarter-inch strap that carries your artwork also wears more comfortably through a long day.
Specify in three moves and the rest of the order falls into place. First, look at your busiest artwork and pick the narrowest width that still gives it breathing room, defaulting to five-eighths of an inch when in doubt and stepping up to three-quarters or one inch for sponsor-heavy or full-color designs. Second, let that width point you to a print method, choosing screen print for one or two colors and dye sublimation when the design needs full color or fine detail. Third, set the strap length from your audience, taking thirty-six inches as the safe default and reaching for an adjustable strap when one run must serve very different wearers. Handled in that order, width and length stop being afterthoughts on the order form and start doing exactly what you need them to at the event.